Creatively Inclined
  • Home
  • Apparel
  • Décor
  • Abode
  • Details

Quilted Skirt with Pockets

7/1/2015

0 Comments

 
Picture
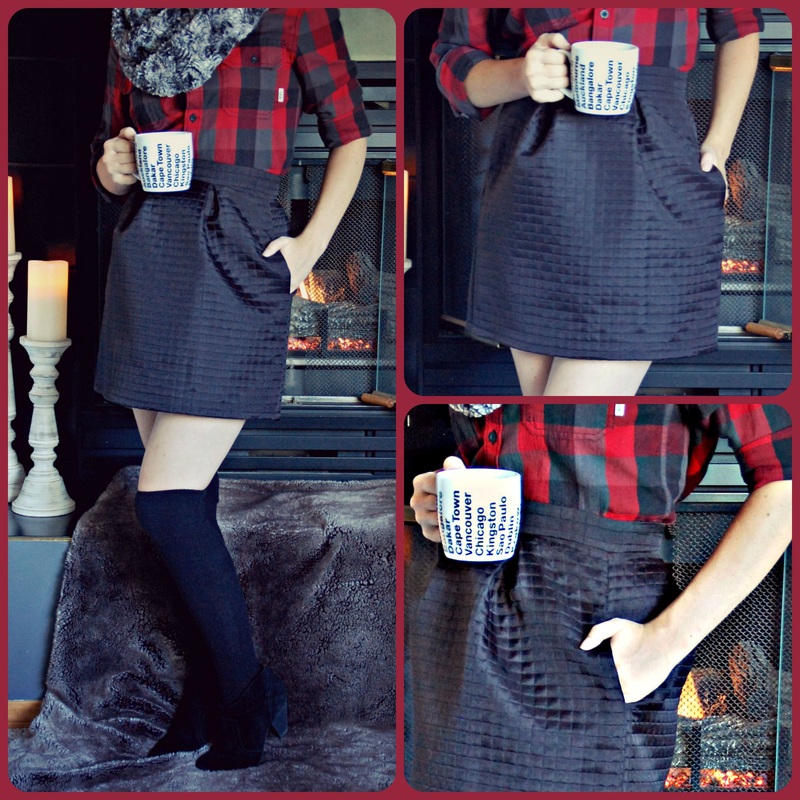
I live in the Great White North, so while I love light fabrics, sometimes the winter calls for something a little heavier! The quilted fabric also adds structure and texture, giving this “little black skirt” some character.

Skill Level: Intermediate to advanced sewer.

Notions: 
  • Quilted fabric – I’d go with a solid colour, with the texture and pleats a pattern may get a little busy. I used a quilted silk (intended for home décor, but I love it for these types of skirts!)  
  • Thread 
  • Invisible zipper 

How to Guide: 
 

Get out a pad of paper to keep track of your measurements! 
  • Waist: Measure your natural waist. 
  • Length: Measure the length between your waist to above your knee (or to whatever hem length you desire). 
  • Adjusted Waist: multiply your waist measurement by 3 and add 2 inches - for the pleats and zipper. 
  • Adjusted Length: Add 6 inches to your length measurements (to make room for the hem). 

Cut it out
 
  • Lay out your fabric on a hard smooth surface, wrong side up. 
  • Measure and cut a rectangle using your adjusted width by adjusted length. 
  • Find the centre of your rectangle and mark with chalk near the upper edge.  
  • Fold each side to the middle so that the edges are in line with the centre mark. 
  • Mark the length of the fold line on each side. 
  • Cut down the fold line.  
  • You should now have 3 pieces - 1 large and 2 that are half the size of the large.  
  • With the large piece facing right side up, place your 2 smaller pieces face down on top, lining up the outer edges (where you just cut).  
  • Starting on one side, pin the top edge, and then measure about 4 inches down and place another pin.  
  • From the lower pin, leave a gap of about 6 inches (for the pocket) and pin the remainder of the edge closed.  
  • Repeat on other side.  

Waist no space
 
I like a 2 inch thick waist band, but you can go wider or thinner. 
  • Waistband width: using your desired waistband thickness (say 2 inches) double this (4 inches) and add 1 inch for the seam (total of 5 inches). 
  • Waistband length: your waist measurement + 2 inches. 
  • Lay out your fabric on a hard smooth surface, wrong side up. 
  • Measure and cut a rectangle using your waistband width by waistband length. 
  • Fold the length of the rectangle in half, right side out, and press! 
  • You can add interfacing to the waistband if the lining is thin or flimsy.  

Hands in pockets
 
  • Print out the pocket template - make adjustments to the size by placing you hand over the template with your wrist resting along the dotted line and tracing the new outline.
  • Cut out your adjusted pocket template. 
  • Lay out your access fabric on a hard smooth surface and fold right sides together. 
  • Place the pocket template on your fabric with the straight edge in line with the salvage edge. Pin in place.  
  • Cut out your first pocket.
  • Flip your template over to the reverse side and place it on the straight edge in line with the salvage edge. Pin in place.
  • Cut out your second pocket.
  • You should have 2 sets of opposite pieces. Pin each pocket together, but leave the straight edge unpinned.  

Get out your sewing machine
 for some quick stitches! 

Setting up the sidelines 
  • Grab your pockets.  
  • Leaving a ½ space between the straight edge of your pocket and where your stitch line begins, sew along the edge of your pocket. Repeat for other pocket.  
  • Grab the 3 pieces for your skirt. 
  • Starting with one side, hold your pockets up to the opening in your skirt and adjust the pins to above and below the straight edge to mark where your pocket will sit. 
  • Repeat on other side.  
  • Sew the seam closed above and below the pins.  
  • Your 3 pieces should now be one again, but with an opening in each of the seams.  

Pockets, pockets, pockets!
 
  • Lay your skirt flat with the wrong side up.  
  • Starting with one of your pockets, curl open one side of the straight edge of the pocket and place it along the opening of your skirt so that the right sides are facing.  
  • Now curl open the other side of the straight edge of the same pocket and place it along the other side of the opening of your skirt so that the right sides are facing.  
  • The opening of your pocket and the opening of your skirt should be in line.  
  • Repeat for second pocket.  
  • Starting with one of your pockets, sew along each side of the pocket. Try to get as close to the side seam as possible so that they are no gaps between the pocket and side seam.  
  • Repeat for second pocket.  
  • Turn your skirt right side facing, when you look inside the pockets the right side should be face up. 
  • Finish the pockets and sides with a zig-zag or serge stitch. 

Pleat it!
 
  • Lay out your skirt on a hard smooth surface, right side up. 
  • Find the centre and mark with chalk near the upper edge.  
  • From the centre upper edge, measure and mark every 1.5 inches 
  • Once marked, go back to the center and starting from one side (left or right does not matter) fold at the first mark (wrong side to wrong side) so that the second mark is laying under the centre mark. Pin flat.  
  • On the right side facing up, the fold line should be resting on the third mark.  
  • Fold over the fourth mark (right side to right side) so that the fifth mark is in line with the third mark and touching your previous pleat.  
  • Keep doing this until you run out of marks.  
  • Repeat on other side.  
  • The skirt should now be the length of your waist measurement + 2 inches. 
  • Press down the pleats! 

Get prepped! 
  • Grab your skirt again and unpin the pleats.  
  • Facing right side up, where the folds of the pleats meet, line up the fold lines directly on top of each other and pin on the back side, about 1 inch from the top edge.  
  • You should now have what looks like a row of loops in the waist line.  

Putting the pieces together
 
  • With your skirt facing wrong side up, starting at the top edge, put a 1 inch long stitch directly along each of the pleat fold lines.  
  • Take any remaining pins out.  
  • Once again, you should now have what looks like a row of loops in the waist line.  
  • Using the fold lines you pressed earlier as a guide, push down the pleats and pin.  
  • Baste stitch 1 inch along the waistline to keep the pleats in place.   
  • Staring at one end of your skirt, pin one side of the waistband (right sides together) along the edge of the waistline and baste together. Seam should run 1 inch from the edge, directly over the pleats baste stitch. 

Check point – try it on! 
  • The skirt should slip over your hips with room for the waistband to close (you still need space for the zipper!). 
  • Make adjustments if needed. 
  • Finish the edge of the inner waistband with a zig-zag or serge stitch. 

Zip it 
When applying an invisible zipper, it is done with the right side of the fabric facing up, unlike all other types of zipper applications. 
  • Open up the zipper and uncurl the zipper teeth to make it flat as possible. 
  • Starting at the fold line in your waistband, on one side (left or right it doesn’t matter) lay the zipper open wrong side up (on your right side facing fabric) along the length so that the teeth are 1 inch from the salvage edge. The other half of the zipper should fall on the same side you are working on. Pin in place.  
  • From top to base, stitch as close to the teeth as possible along the seam line. Backstitch both ends to ensure durability.  
  • Taking the other half of the zipper, flip it to the other side so that the salvage edge of the fabric and the non-teeth edge of the zipper line up. Like before, teeth should be 1 inch from the salvage edge. Pin in place. 
  • From top to base, stitch as close to the teeth as possible along the seam line (this is a little trickier with the first side being stitched in). Backstitch both ends to ensure durability.  
  • From the inside, fold your skirt with right sides together. 
  • Starting at just above the base of your zipper, pin your skirt closed. 
  • Stitch the back seam of your skirt by sewing 1 inch from salvage edge.   
  • Finish your back seam with a zig-zag or serge stitch. 

Finishing touches
 
  • Fold your waistband over along the press line.  
  • Fold under the salvage edges of your waistband and pin. As you pin your waistband closed, tuck in the salvages edges of your inner waistline.  
  • Press, press, press!  
  • Sew the inside of your waistband closed. I personally like to finish the waistband by hand so that it has a “seamless” finish.  
  • Try on your skirt and mark or pin where you want the hem length.  
  • Fold and pin along the edge using your hem marker, and press 
  • Open the hem line and fold the salvage edge into the hem line. You may need to trim a little off the end to get a clean, ½ inch hem. Pin closed and press.  
  • Sew your hem closed.  

Throw on your
 favourite flannel top, a chunky scarf and booties with this skirt, and walk to your nearest coffee shop for some hot coco. 

0 Comments


Leave a Reply.

    Click "Read More" under each project for detailed steps. 

    Categories

    All
    Baby Accessories
    Baby Clothes
    Halloween Special
    Ladies Accessories
    Ladies Clothes
    Maternity Clothes
    Toddler Accessories
    Toddler Clothes

Proudly powered by Weebly
  • Home
  • Apparel
  • Décor
  • Abode
  • Details