Creatively Inclined
  • Home
  • Apparel
  • Décor
  • Abode
  • Details

Romantic Tulle Skirt

7/10/2015

0 Comments

 
Picture
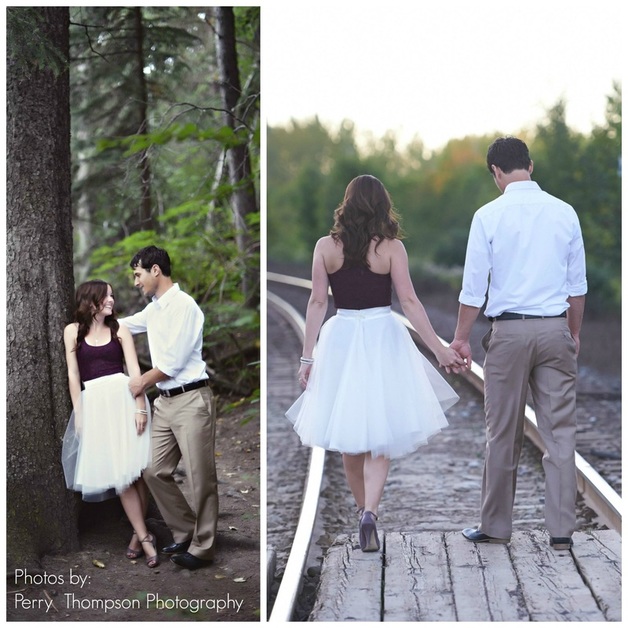
I created this romantic skirt for our ‘whimsy woodland picnic’ engagement photos. I was looking for something that had a hint of vintage but was fun and girly too. I also love details so I added a scalloped hem on the liner and a pearly broch over the back closure. 

Skill Level: Intermediate to advanced sewer. 
Notions:
  • Tulle – comes in a variety of colours, the choice is yours
  • Liner – I like mine to match the colour of the tulle as close as possible as it is somewhat visible, but you can mix it up too if that’s your style! Silk or satin works well for texture, a low/medium shine looks luxurious under the tulle
  • Thread
  • Invisible zipper
  • Scalloped binding tape or lace trim
  • Broach for back closure (optional)
  • A yard of string – nothing fancy this is just to be used as a measuring tool

How to Guide:

Get out a pad of paper to keep track of your measurements!
  • Waist: Measure your natural waist.
  • Length: Measure the length between your waist to the middle of your knee (or to whatever hem length you desire).
  • Adjusted Waist: Add 2 inches to your waist measurement (to make room for the zipper).
  • Adjusted Length: Add 2 inches to your length measurements (to make room for the hem).
 
*Mini math tutorial* circumference is the measurement around the edge of a circle and the radius is the measurement from the middle to the edge of a circle.

  • Waist Radius: Calculate using your adjusted waist measurement and dividing by 6.28.
  • Length Radius: Calculate by adding your adjusted length measurement (remember the added two inches!) + your newly found waist radius measurement.

Make a giant compass
  • Remember Grade 4 math? Well it finally came in handy for something! Tie your piece of string around a pencil near the tip. Starting where the string is tied to the pencil take your length radius measurement and mark this on the string. Tie the other end of the string to a second pencil where this measurement ends. You should now have two pencils tied at the ends of a string. The length between the two pencils should match your length radius measurement.
  • Starting from one pencil tip, mark the length of your waist radius on the string for later.
 
The silver lining
  • Lay out your lining on a hard smooth surface, wrong side up.
  • Using your giant make-shift compass, in the centre of the fabric place one pencil tip down and extend the string until taut with second pencil also tip down. Keeping the pencil in the middle of the fabric in place, use the second pencil to trace the outer circle of your skirt
  • Retie your compass so that the distance between the two pencils matches your waist radius (you marked this on the string a few steps earlier)
  • In the center of the fabric (same as before) place one pencil tip down and extend the string until taut with second pencil also tip down. Keeping the pencil in the middle of the fabric in place, use the second pencil to trace the inner circle of your skirt
  • Draw a line from the centre of the skirt to the outer edge for the opening (or zipper line)
  • Cut out both circles and up the centre line

Like a layered cake
  • Lay out your tulle on a hard smooth surface
  • Place your lining on top to use as a make-shift pattern
  • Trace around the inner and outer circle
  • Cut out the inner and outer circles – do not cut a line for the opening! This comes later.
  • Repeat for the desired number of tulle layers – the skirt I did was 3.

Waist no space
I like a 2 inch thick waist band, but you can go wider or thinner – although I do not suggest going smaller than 1 inch or it will not hold up with the weight of the skirt.
  • Waistband width: using your desired waistband thickness (say 2 inches) double this (4 inches) and add 1 inch for the seam (total of 5 inches).
  • Waistband length: your adjusted waist measurement.
  • Lay out your lining on a hard smooth surface, wrong side up.
  • Measure and cut a rectangle using your waistband width by waistband length.
  • Fold the length of the rectangle in half, right side out, and press!
  • You can add interfacing to the waistband if the lining is thin or flimsy.

Now you have all the pieces of your skirt ready – it is time to get out your sewing machine!

Get prepped!
  • Baste the inner circle of your pieces of tulle together, seam should run ½ inch from the edge.
  • Baste the length of your liner together down the zipper line – you should have 1 inch of salvage on each side with the inner circle matching your waist measurement.

Putting the pieces together
  • Lay the lining flat and place the tulle on top, the tulle should be 2 inches wider.
  • Pin the inner circle of the tulle to the inner circle of the liner with the access tulle pulled to the center hem of the liner and baste together. Seam should run 1 inch from the edge.
  • Pull the baste stitching of the liner out half way (this is to make room for the zipper later on).
  • Staring at one end of the lining salvage, pin one side of the waistband (right side down against the tulle) along the edge of the inner circle and baste together. Seam should run 1 inch from the edge, directly over the baste stitch.
  • Lay the access tulle flat and even across the zipper line, following the line of where the zipper will sit, clip the tulle open by the length of the zipper teeth.

Check point – try it on!
  • The skirt should slip over your hips with room for the waistband to close (you still need space for the zipper!).
  • Make adjustments if needed.
  • Finish the edge of the inner circle with a zig-zag or serge stitch.
 
Zip it good
When applying an invisible zipper, it is done with the right side of the fabric facing up, unlike all other types of zipper applications.
  • Open up the zipper and uncurl the zipper teeth to make it flat as possible.
  • Starting at the fold line in your waistband, on one side (left or right it doesn’t matter) lay the zipper open wrong side up (on your right side facing fabric) along the seam line (or so that the teeth are 2 inches from the salvage edge). The other half of the zipper should fall on the same side you are working on. Pin in place with the layers of tulle between the lining and zipper.
  • From top to base, stitch as close to the teeth as possible along the seam line. Backstitch both ends to ensure durability.
  • Taking the other half of the zipper, flip it to the other side so that the salvage edge of the fabric and the non-teeth edge of the zipper line up. Like before, teeth should be 1 inches from the salvage edge. Pin in place.
  • From top to base, stitch as close to the teeth as possible along the seam line (this is a little trickier with the first side being stitched in). Backstitch both ends to ensure durability.
  • From the inside, fold your lining with right sides together.
  • Starting at just above the base of your zipper, pin your skirt closed.
  • Stitch the back seam of your liner closed by stitching back over your baste stitch line (or 1 inch from the salvage edge). Be sure to not sew in the layers of tulle! The tulle should be sewn into your zipper but you do not want them pulled into the full back seam of your skirt.
  • Finish your back seam with a zig-zag or serge stitch.
 
Finishing touches
  • Fold your waistband over along the press line.
  • Fold under the salvage edges of your waistband and pin. As you pin your waistband closed, tuck in the salvages edges of your skirt so that the tulle and lining is hidden.
  • Press, press, press!
  • Sew the inside of your waistband closed. I personally like to finish the waistband by hand so that it has a “seamless” finish.
  • Try on your skirt again to ensure the liner falls at the right length. Trim if it is too long.
  • Pin the binding tape or lace trim along the bottom edge of your lining. Pin and sew in place.
  • Try on your skirt one more time to ensure the tulle is the right length. Trim if it is too long.
  • Add your broach.

Get done up, and take your beautiful tulle skirt for a night out!

0 Comments


Leave a Reply.

    Click "Read More" under each project for detailed steps. 

    Categories

    All
    Baby Accessories
    Baby Clothes
    Halloween Special
    Ladies Accessories
    Ladies Clothes
    Maternity Clothes
    Toddler Accessories
    Toddler Clothes

Proudly powered by Weebly
  • Home
  • Apparel
  • Décor
  • Abode
  • Details