|
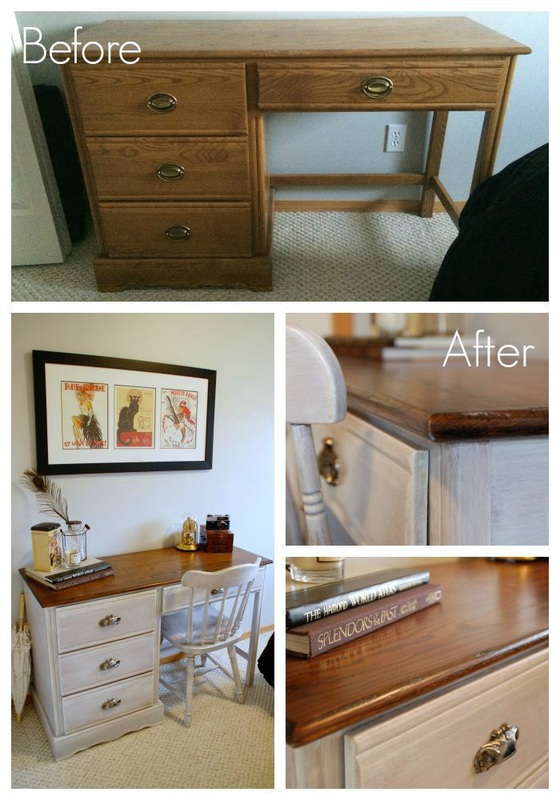
My parents bought me this desk when I was about 2 years old, and after almost 30 years it was looking a little worn and needed an update. It is made from solid oak, so it was still in pretty good shape, but after years of use, it had a few “love marks”. While I like the look of natural wood, I wanted to try something new so decided to give it a two-tone look, with the base done in white wash and the top stained a dark chocolate. Skill Level: Beginner to Intermediate  Made from mostly reused material Materials
Tools
How to Guide Clean up
Sands of time I am not for using paint stripper, as it is high in VOC, unless you absolutely have to. If your piece is just coated in a protective finish then I suggest only sanding, but sand thoroughly! You don’t need to get right down to the wood grain, but you want it to be a little rough so that the paint sticks. Be sure to get into all the nooks and crannies so that the details of your piece come through. This may take some time and patience, but it will be worth it in the end! *Tip - for the areas that are being stained, try to get the surface sanded as evenly as possible or the stain will darken at different rates. In the areas where there is the most wear the top coat is likely thinner, so make sure you do some extra sanding outside of this space. When you are done sanding, wipe clean with a damp cloth so that the surface is smooth and dust free. New hardware If your new hardware is the same size, skip this step. *Tip - if you are replacing your hardware with a different size, make sure that it is bigger so that it covers the holes of your old hardware.
Top stain Tape the area below your stain line. You don’t have to cover your whole piece, but you should tape off the stain line so that it is nice and crisp with no drips.
Repeat these steps until you are happy with the colour depth. White wash Begin by watering down your paint.
Before you start painting, tape the reverse of your stain line to ensure you maintain the crisp line between the stained top and white washed base. The most important part of white washing is to keep your paintbrush as dry as possible. You need a very small amount of paint on the brush tip - you want the strokes to be “streaky”. With that in mind, working in a small area, lightly brush along the grain. The paint will dry quickly so try not to be too broad in your strokes or it will cause clumping. *Tip – if your paint brush is getting too wet, dab it on the paper towel. I suggest dabbing after every dip into the paint before applying it to your piece. The first coat it might look like you barely applied any paint. Restrain yourself from adding more paint, the colour will deepen with more coats! With white washing it is better to do many thin coats, than 1-2 heavy coats, or you will not get the “washed” look. Let the paint dry completely between coats and add additional coats until the colour is consistent and you are happy with the tone. You may prefer less if you want to see the wood grain. My desk was done in 3 light coats, and then 1 additional coat to some areas to ensure a finished look. *Tip – the tone of your piece will vary by wood type. Even though I used a creamy white, mine looks a little more lavender because of the oak wood. Bald Spots If you were impatient and did not wait for the paint to fully dry between coats, like I did, you may have pulled off some of the previous coats and cause what I like to call “bald spots”. If you did, you can fix these spots by doing the following:
Seal it! Once you are happy with how your piece looks apply your coats of sealer or wood finish to the top and base as directed. This will keep your piece protected and easy to wipe down. Finishing touches Add your new hardware using the pilot holes as a guide for where your screws sit. You may need an electric drill to get your screws through the wood. Place your new piece in a place for all to see!
0 Comments
Leave a Reply. |
Click "Read More" under each project for detailed steps.
Categories
All
|

